

- Quick Answer
- Why Use an Online Video Cutter?
- What Does "Cutting a Video" Mean? (Trim vs. Cut-Out vs. Split vs. Crop)
- How to Cut or Trim a Video Online for Free in 3 Steps (with VideoBee)
- Common Reasons People Cut Videos
- How to Cut a Video Without a Watermark
- How to Cut a Video Without Downloading Software (Phone & Desktop)
- Trim Videos for Social Media (TikTok, Reels, Shorts, YouTube)
- Cloud vs. In-Browser Cutting — Which Should You Use?
- Frequently Asked Questions
- Conclusion
How to Cut a Video Online for Free (No Watermark)
Quick Answer

If you just need to drop the parts of a video you don't want, you don't need a full editor. An online cutter lets you upload the file, mark the section to keep or remove, and export a clean clip without installing anything. VideoBee's cutter takes files up to 5GB, exports MP4, MKV, or MOV, and stamps no watermark on the result — no account required.
Last month I sat through a 47-minute webinar and needed exactly four minutes of it for a client recap. The old routine would have been: drop the file into a desktop editor, wait for it to load, fight the timeline, re-export, and lose twenty minutes to a job that should take two. Once you know how to cut a video online, that story gets a lot shorter — upload your clip, drag the timeline, export.
"Cutting" and "trimming" get used interchangeably, and that's fine — they point at the same core move: dropping the parts you don't want, keeping the parts you do.
One honest note before we start. VideoBee processes your video in the cloud — the file uploads to a server to be cut. This isn't a local, on-device editor. The upside: it handles clips far bigger than a browser tab could ever hold, and finished files are deleted after 24 hours. More on that trade-off later.

Figure 1: Cutting a video online comes down to marking the part you keep and the part you drop.
Why Use an Online Video Cutter?
Because sometimes you just don't need a full editor. If the job is "remove the dead air, keep the good part," opening a desktop NLE for it is like renting a truck to mail a letter. An online cutter skips the install, skips the project setup, and — since VideoBee processes in the cloud — skips your laptop's RAM limit entirely. Files up to 5GB go through fine.
The honest flip side: if you're doing multi-track edits, effects, or color grading, you want a real editor, and this tool isn't that. For trims, cut-outs, and quick exports, the browser route is hard to beat.
What Does "Cutting a Video" Mean? (Trim vs. Cut-Out vs. Split vs. Crop)
Before we get to the buttons, let's name what you're actually trying to do. Four words get thrown around, and they don't mean the same thing.
Trim — keep one segment (remove the start or end)
The most common job by far. You shot twelve minutes and only the middle six matter — the dead air at the start, the fumbling at the end, all gone. Trimming keeps one continuous segment and drops the rest. In VideoBee this is the "Keep Selected" action: mark the range you want, everything outside it disappears.
Cut out the middle — remove a section and rejoin the rest
Sometimes the problem sits in the middle of the clip. A meeting recording with a five-minute detour into small talk. A tutorial where the demo crashed and you talked around it. That's "Remove Selected": mark the unwanted slice, and the tool stitches the remaining pieces back into one continuous file. No gap, no jump-cut you have to patch by hand.
Split — break into multiple clips
Quick reality check, because this one trips people up. "Split into clips" usually means exporting several separate files — clip 1, clip 2, clip 3. VideoBee's cutter doesn't do multiple files in one pass; it trims and it removes, that's it. If you genuinely need five standalone clips, run the trim on the same source five times, keeping a different segment each time. A few extra clicks, not a dead end.
Crop — change the frame, not the length
Crop is the imposter on this list. It changes what's inside the picture — zooming in, squaring off a 16:9 shot, dropping black bars — and does nothing to the running time. If your video is too long, crop won't save you; if you want a different aspect ratio, that's a separate job. You can read more about the cut video action and where it fits.
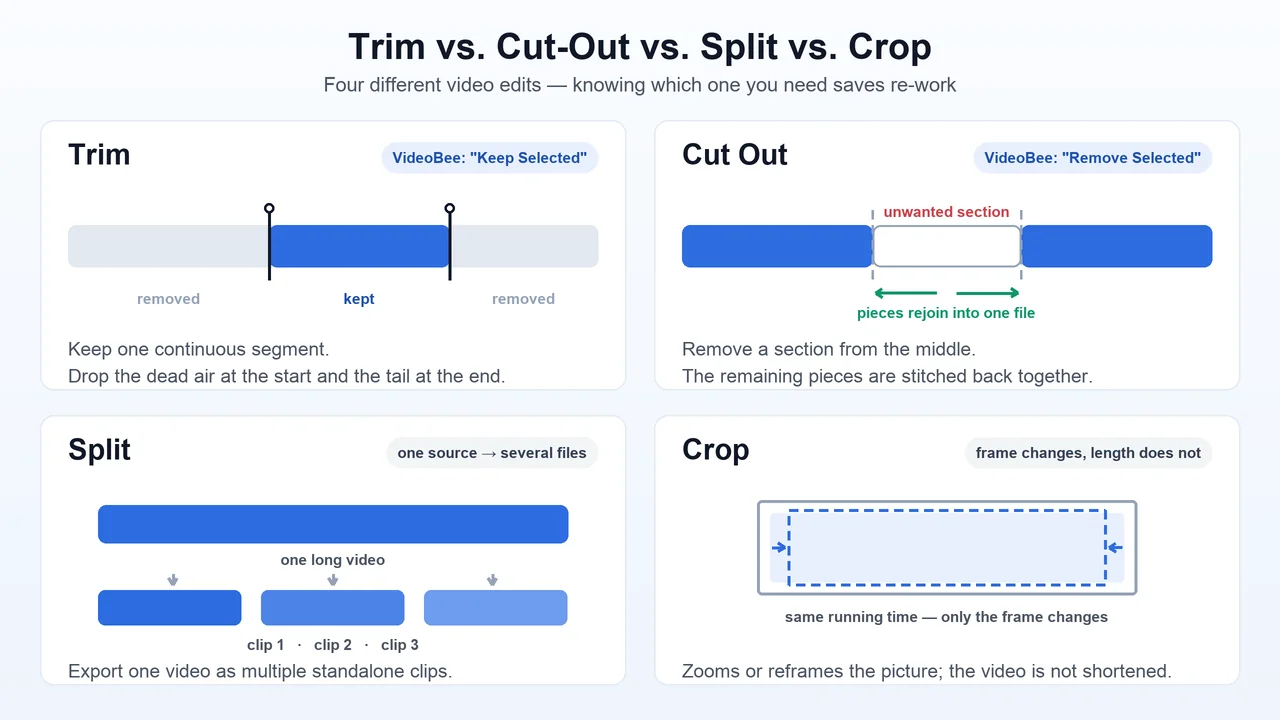
Figure 2: Trim, cut-out, split and crop solve different problems — VideoBee's cutter handles the first two.
How to Cut or Trim a Video Online for Free in 3 Steps (with VideoBee)
Enough theory. Here's the actual workflow.
Step 1 — Upload your video (up to 5GB, MP4/MOV/AVI/MKV/WebM & more)
Drag your file into the upload area or pick it from your computer. The cap is 5GB per file, and it takes the usual suspects — MP4, MOV, AVI, MKV, WebM — plus 30+ more formats. Because the cutting happens in the cloud, your laptop's RAM is never the bottleneck. That 4K recording that would make an in-browser editor fall over? Uploads fine here.
Step 2 — Select a section to keep or remove
Honestly, this is the satisfying part. You get a timeline with draggable handles, or you can type exact start and end times if you're the precision type. Two buttons do the real work:
- Keep Selected — everything inside your marked range stays, the rest is cut. That's your trim.
- Remove Selected — everything inside the range goes, the pieces on either side rejoin. That's your cut-out-the-middle.
Boring intro? Mark it, hit Keep. Bad stretch in the middle? Mark it, hit Remove. The preview updates as you go, so you can see exactly what survives before you commit — which is the part desktop editors make weirdly difficult.
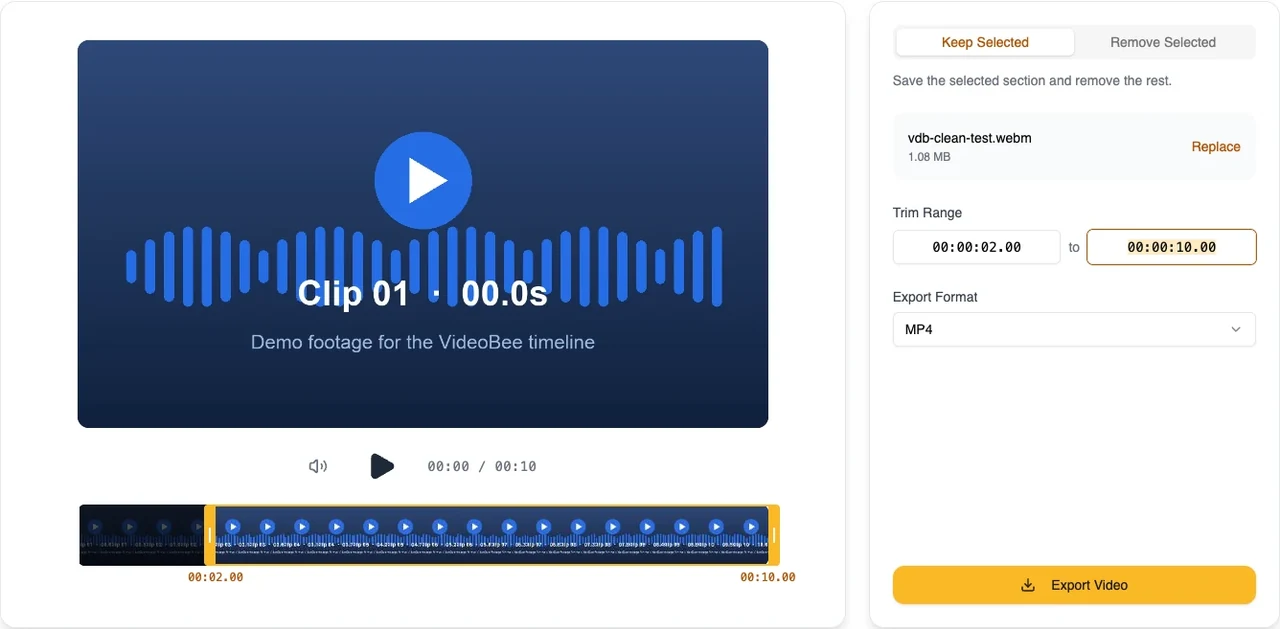
Figure 3: The VideoBee editor — drag the timeline handles or type exact times, then choose Keep Selected or Remove Selected.
Step 3 — Export and download
Pick your output container — MP4, MKV, or MOV — hit Export Video, watch the preview, download. MP4 files typically use H.264 or H.265 encoding (Wikipedia: Advanced Video Coding), which plays on basically every device and editor. No watermark gets stamped on the result, and nobody asked you to create an account along the way. Audio comes through intact.
A quick word on quality, because someone will ask. The tool may re-encode during export, so the output won't be bit-for-bit identical to your source. In practice the picture stays close to the original. Just don't expect a lossless, pixel-perfect clone — that's not what a cloud trimmer promises, and anyone who says otherwise is overselling.
How People Use the VideoBee Cutter
Two real examples from people who run clips through it:
Pulling a short client clip from a long recording
"I only needed 20 seconds from a much longer recording. Dragged the handles, checked the cut and downloaded it. Nice not having to make an account for that." — Alex Morgan, Freelance Content Creator
Use case: grabbing the exact seconds a client needs out of a long source file — no account wall in the way.
Cleaning up a meeting recording before sharing
"Our meeting recording had a long wait in the middle. I removed that section and sent the shorter version to the team. The rest stayed in one file." — Emma Patel, Project Coordinator
Use case: cutting dead time out of the middle while keeping one continuous file.
Common Reasons People Cut Videos
Most cutting jobs fall into four buckets:
Social clips. The raw take runs 90 seconds; TikTok wants the best 15. Trim the fluff, post the moment.
Online courses and tutorials. You recorded the whole lecture, but the student needs the three parts that matter. Cut them into watchable segments.
Product demos. Loading screens, retakes, the "umm" stretch — gone, and suddenly the demo looks tight.
Personal footage. Travel clips and family recordings always come back with dead air at the start. Snip it, keep the memory.
How to Cut a Video Without a Watermark
Where free tools usually stamp a watermark
The oldest trick in the free-tool playbook. You do all the work, hit download, and there it is — a logo in the corner, a banner across the bottom, sometimes a translucent "trial" mark that won't come off until you pay. Some services hide the removal behind an upsell; others bake it in and hope you don't notice until the clip is already shared. Not malicious exactly, but it ruins a video you wanted to look clean.
How VideoBee keeps exports clean
No watermark on your export, period. The free tier is the same export you'd get on a paid plan — there's no "pay to remove the mark" step, because the mark was never there. Combine that with no required sign-up and you skip both the logo and the account friction in one move.
How to Cut a Video Without Downloading Software (Phone & Desktop)
Trim a video on iPhone
Your iPhone's Photos app can trim, and for a quick snip it's fine. But it locks you into the device, and bigger files get unwieldy. Open VideoBee in Safari instead and you get the same cutter you'd use on a desktop — upload, mark, export — nothing to install. I've done this on a bus with a clip someone had just sent to a group chat: ten seconds of trimming, straight back into the conversation.
Trim a video on Android
Same story. Chrome or any modern browser loads the tool, the touch timeline works fine for marking start and end, and there's no Play Store trip involved.
Trim on Windows or Mac — same browser workflow
Desktop gets the identical experience. Windows or macOS, the cutter runs in the browser — no install, no platform-hunting. Yes, iMovie or Premiere will do more. But if all you need is a trim or a middle-section removal, the browser route is the ten-second option, not the ten-minute one.
Trim Videos for Social Media (TikTok, Reels, Shorts, YouTube)
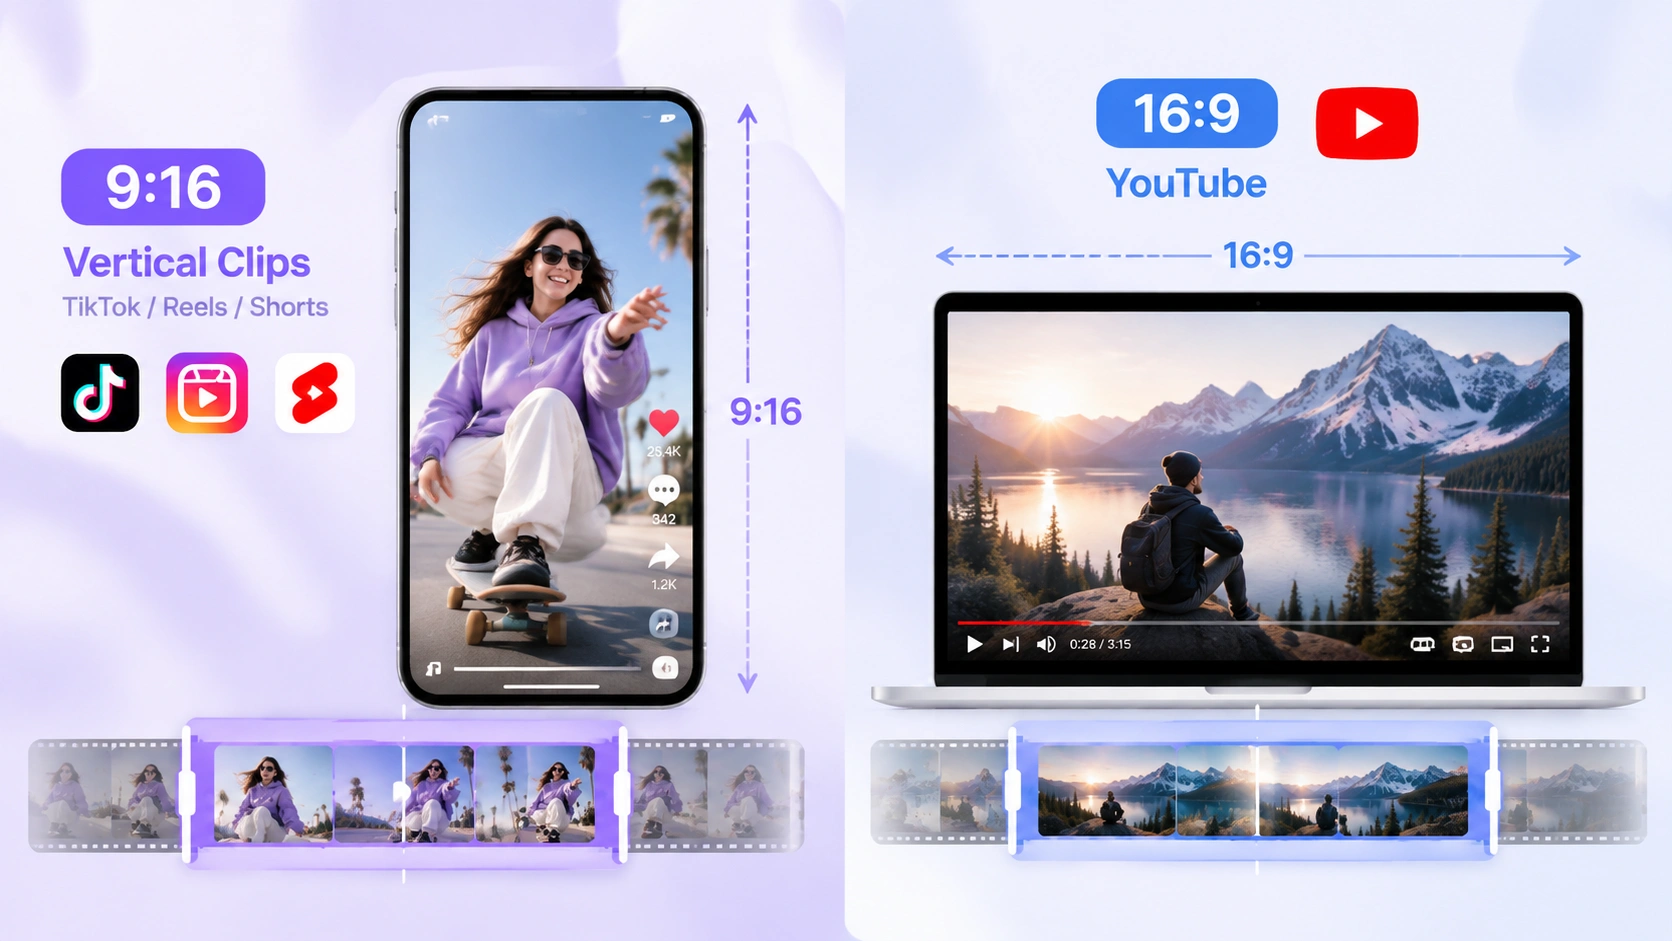
9:16 vertical clips for TikTok / Reels / Shorts
Vertical is the default for TikTok, Instagram Reels, and YouTube Shorts. The 9:16 aspect ratio fills a phone screen top to bottom, which is where those audiences actually watch. My rule: trim the horizontal footage down to the moment that matters first — the goal, the punchline, the drop — then worry about the vertical frame. A tight vertical clip almost always beats a wide one squeezed into a portrait letterbox.
16:9 for YouTube
YouTube still lives in landscape. The 16:9 aspect ratio is the safe bet for a standard upload — a lesson segment, a product demo, a trimmed meeting highlight. Cut the fluff, keep the signal, export, done.
Cloud vs. In-Browser Cutting — Which Should You Use?
Some cutters run entirely inside your browser, which keeps the file on your device — a genuine privacy win for small clips, but browser memory caps those tools around 2GB, so a large 4K recording hits a wall mid-project. Cloud cutters flip that: your file uploads to a server (over HTTPS, deleted after 24 hours, never used for AI training), and clips up to 5GB go through without your device breaking a sweat. So it's really "stays on my device but caps around 2GB" versus "uploads but takes far bigger files and clears them within a day." Pick based on your clip size and your own comfort line.
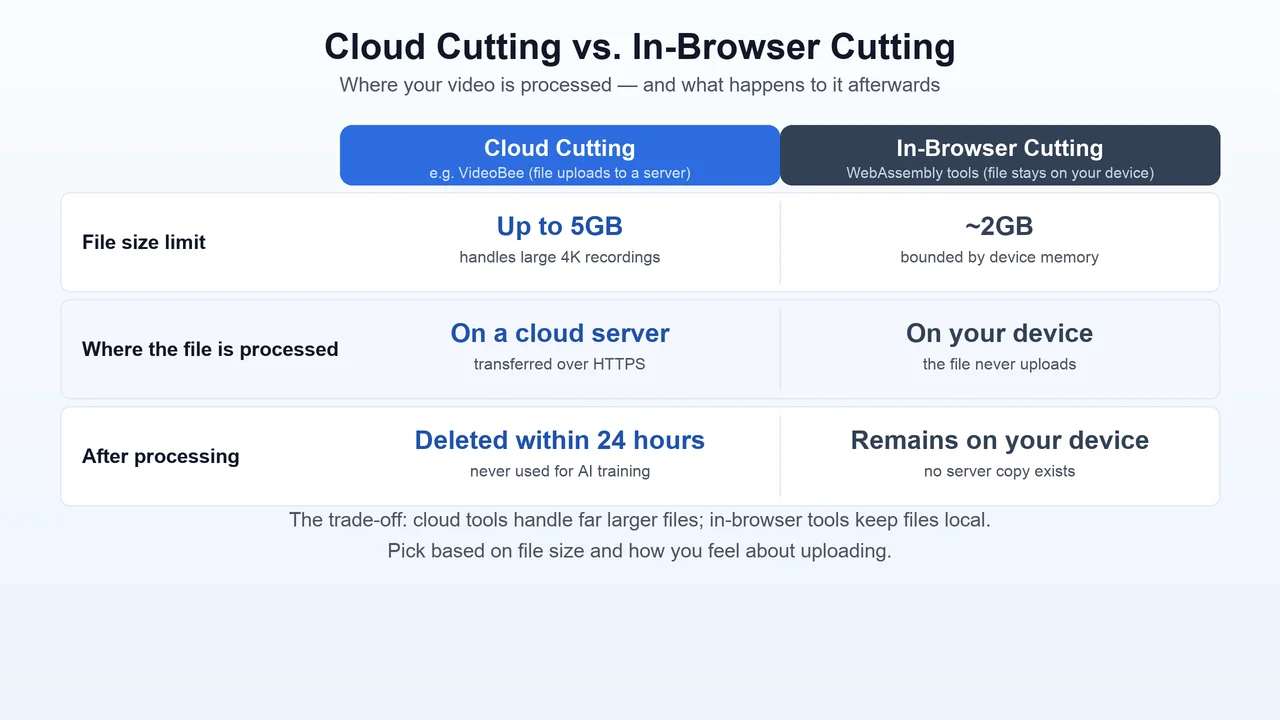
Figure 4: Cloud cutting handles far larger files; in-browser tools keep everything on your device.
Frequently Asked Questions
How do I cut a video online for free? Upload your file to a free cutter like VideoBee, mark the section to keep or remove, export. No payment, no account.
Can I cut a video without losing quality? Quality stays close to the original, but the tool may re-encode during export — it's not a lossless, bit-for-bit copy. For sharing and social posting, the difference is invisible.
What's the maximum file size? Up to 5GB per file — roomier than most in-browser tools allow.
Which formats can I cut? It takes MP4, MOV, AVI, MKV, WebM and 30+ more on intake, and exports to MP4, MKV, or MOV. The MP4 and MKV containers are widely supported across devices and editors.
Is my video private? Files move over HTTPS and are deleted 24 hours after processing, and VideoBee doesn't use uploads to train AI models. The honest trade: cloud means the file does upload to a server — that's what lets it handle bigger clips.
Do I need to sign up? No. Sign-up is optional — cut and download without an account.
Can I cut a video on my iPhone or Android without an app? Yes. Safari on iPhone or Chrome on Android runs the cutter right in the browser — nothing to install, no App Store or Play Store trip.
Can I remove a part in the middle of a video? Yes — "Remove Selected" deletes the middle section and the remaining pieces rejoin into one continuous file.
Can I split a video into multiple clips? Not in one export. VideoBee trims and removes, but it doesn't output several separate files at once. To get multiple clips, trim the same source repeatedly, keeping a different segment each time.
What's the easiest way to trim a long video? Upload it to an online cutter, mark the part worth keeping, export. That 47-minute webinar with four good minutes in it? Mark the four minutes, hit Keep Selected, done.
Can I cut MP4 videos online? Yes — MP4 is the most common format people bring, and you can export back to MP4, or to MKV/MOV if you prefer.
Conclusion
That's the whole job: pick the part that matters, drop the rest. No software, no watermark, no account — upload up to 5GB, mark keep or remove, export to MP4, MKV, or MOV, done in minutes.
The next time a 47-minute webinar turns out to have four good minutes in it, you know the moves. Open VideoBee's free online video cutter, upload your clip, choose Keep Selected or Remove Selected, and export the finished video — no sign-up, no watermark, files cleared after 24 hours.